Friday, January 28, 2011

Counterfeit Kit Challenge January Blog Hop!

Welcome to the Counterfeit Kit Challenge Blog Hop! Every month one of our challenges will be reserved for an end of the month blog hop! You should have started here: http://counterfeitkitchallenge.blogspot.com/


Today's hop is inspired by a roll of our creative die: Card/Fashion/Bling

And here is my fashion inspiration:

I had all sorts of ideas swirling through my head on how to do the ruffles and experimented quite a bit with scrap paper. I finally just cut my favorite green patterned paper (jillibean soup) into a strip and then used a border punch to give a more ruffled feel. I added them to the card base at an angle and overlapped them to get the same feel as the photo. Then I bent the ruffles up to give it some demension.

I added cream at the top (that is the color I would wear with this...lol), but it needed some sort of separation, so I added a grey "belt". The buckle is a chipboard one I had that I heat embossed with silver. My bling is pretty obvious. I love my I-Rock! So easy and fast to use! Some faux stitching and a quick sentiment finish it out.

Supplies in addition to my kit:

I-Rock crystals, Fiskars Border Punch, chipboard buckle, embossing powder, CTMH sentiment stamp

Thanks for hopping along with us today! I hope you will be a part of the hop next time!

(Pssst....are you still reading?  Good!  We have some great things planned for February!  You will meet our Guest Designer...see a great new kit to copy and perhaps have a chance to win a prize!  Make sure you are a follower so you don't miss out on ANYTHING!)

Wednesday, January 26, 2011

I am very excited about this weekend!  2 Peas is hosting its annual CHA release party with challenges, sneek peeks of the new products coming out and chances to WIN some of the new goodies!

Clear your schedual and play along Friday-Sunday!  2 Peas CHA Party

Monday, January 24, 2011

How many things can you make from a kit?

I love to have things completed.  For example, I start out every morning writing in my day planner a small To Do List.  I highlight...I cross things off...I detail and subcategorize.  It makes me happy.  (Did you hear my contented, happy sigh?)  It is a bad thing when it comes to food...I really don't like just leaving one cookie in the cookie jar.  Really.  One cookie?  It will get lonely?  And if the kids aren't home then it is my DUTY to care for that lonely cookie.  It is a good thing when it comes to finishing up a kit.  This month's Counterfeit Kit has been wonderful, but I am itching to finish up all of the bits and pieces that are left in it. 

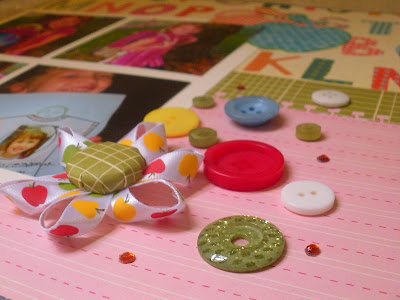
So far I have made a 2 page layout, 1 one page layout and a card.  Now all of the scraps are just sitting there.  Staring at me.  Lonely.  Since I don't make a habit out of eating scrapbook supplies, I am determined to finish up the scraps and clear off my desk for the kit we will be making for February.  So that is what I am working on right now.  Using up the scraps.

I do have a dedicated space for all of my scraps, but, to me, it makes good sense to get the most milage out of putting together supplies for a kit or layout.  Use up the scraps that you KNOW work well together...you already love the project you used them on, right?

Today I decided to get some inspiration from my absolute favorite Garden Girl....Kristina Werner.  Have you seen her website?  No?  Really?  Where have you been?  She makes the most wonderful cards WITH video tutorials so you can recreate them at home.  She is genius at being creative and simple with her designs...and has inspired my love for Kraft paper and faux stitching.  Check her out here: kwernerdesign (warning...video tutorials may be addicting and her love of showing us cute new products may lead you to a MAJOR spending spree...should I count how many of my stamps I HAD to have because I saw how she used them?)

Here is my first inspiration from Kristina:  Make a Card Monday (MACM)   Yep.  She has her own youtube channel full of cardmaking goodness.  (She also does 2 Peas Finally Friday card making videos).


(Supplies added: Kraft cardstock cardbase; black paper, The Girls Paperie frame stamp, CTMH hear stamp, $1 sentiment stamp, postage stamp border punch, I Rock bling)

Next up is a card of my own design...and I wasn't sure it was going to work at all.  I matted the red paper and stuck it down.  Then I realized I had NO idea what I wanted to do with it from there.  LOL  Ever have one of those days?  My very tired first thought was to chuck it, but I decided that I was in great need of an owl card and made it work.
(Supplies added: Kraft Card base, prima flowers, I Rock bling, Stamps: a HUGE set of owls and branches...I forget the company)

My final project was a layout about me.  That does not happen very often, so I really wanted it to be life changing.  Is is not.  LOL  But it is a glimpse of me for my kids someday.


(Supplies added: buttons to the notions, black and white paper scraps, I Rock bling, Alphabet stickers from a Sassafrass kit)

So my total projects from my kit this month?  4 scrapbook pages and 3 cards = 7 projects

Not bad at all!

Monday, January 17, 2011

A very sweet RAK

One of the plays for our Counterfeit Kit Challenge is offering the kit she put together as a RAK!  Isn't that sweet?  Head over to Love Joy Scrap and leave her a comment to be entered to win.  She will take comments until Friday!

Saturday, January 15, 2011

Lace Flowers

Did you see Meridy's tutorial for the Satin Posies? Aren't they amazing? I can't wait to try it, but in the meantime, I needed to come up with an alternative flower. I don't own any material that will work with those flowers (I don't even have any clothes I can cut up...LOL). So I looked around at what I did have and decided to give some lace ones a try.

All it took was a circle cut from cardstock, some hot glue, lace and something to pretty up the center.

Here are links to some tutorials to show you how easy these were to make:
http://http//floralshowers.com/crafts/ribbon-flower/
http://http//thehillsarelivin.blogspot.com/2010/05/jax-from-aly-ash-lace-flower-tutorial.html
Enjoy! My daughter has requested some lace flower hair accessories now. I'd better get to work!


Thursday, January 13, 2011

Our first mini challenge is up!

The Counterfeit Kit Challenge Blog has it's first mini challenge up!  Mini Challenge: Back to School!  We will have a total of 3 mini challenges for January to get us to use the pretty kits we just made.  Play along and post a link on that post of what you create so we can ooohhh and aaaahhhh over it! 

Wednesday, January 12, 2011

Challenges start tomorrow!

I will post challenges every few day starting tomorrow on the Counterfeit Kit Challenge Blog (http://counterfeitkitchallenge.blogspot.com/)! I have three challenges for you for the rest of January so you can use your new kits. I had a blast creating based on these challenges and hope you do, too!

Today I am using the rest of the paper from my kit and then I will have make an extra kit for myself until February's challenges. :) It is so nice to be scrapping so much this month. Maybe I will start on a card kit for me to use for the rest of the month.

Tuesday, January 11, 2011

Just a quick card!

FYI: 2 Pease does free classes and just started a new round of them for 2011! I love them and try to participate as much as possible (I even have them planned in my daytimer). So far 2 of the months classes have gone "live" and they are great! I am trying new things already!


One of my least used supplies would be stickers. Just never really got into them. One of the challenges for January is to use border stickers. Yikes! Luckily, I did have some stickers on hand (American Crafts Remarks collections) that I bought because they were cute. I thought I would try a simple card to get my feet wet.


Not too bad! I think I like them because they are the clear kind. The colors are fun and this was the fastest card I have ever put together! I layered 3 different borders for the bottom. Not much demension, but it looks cute. Rounded corners and faux stitching and I was done.

2 more classes will go live later this month...I can't wait!

Thursday, January 6, 2011

Studio Calico Notions Tutorial

The Studio Calico Notions in the kit look so fresh and are a nice neutral element. They are also pretty easy to recreate yourself. I decided to make mine out of dictionary paper, but you could use tissue paper, patterned paper, old sewing patterns...anything really!

Here is what you need: Dictionary (or other light weight paper), adhesive, scalloped edge scissors, regular sciccors, twine or floss

Tear a page out of the dictionary and cut it into 2 inch strips. (My dictionary is about 7x4 inches)


Take your large scalloped edge scissors and cut scallops along both long sides.

Accordian fold the scalloped strip at each notch (lining up the scallops as you fold..don't worry if it doesn't come out even, just keep folding at the notches).

Hold the folded paper tightly together and cut a small triangular notch in the middle. Do not cut too close to the center as you will need to do the same thing on the other side and don't want to cut all the way through.


Take a piece of baker's twine or any kind of thin floss and tie it around the notches.


Put adhesive on one side of the fan and stick the sides together to form half of a circle.

Do the same on the other side.


Trim the twine, if you like or use it to attatch a button on top.


Play around with different sizes, types of paper, embellishments on the top. Have fun!
If you haven't checked out our challenge blog yet, stop on by to see the kit we are counterfeiting: http://counterfeitkitchallenge.blogspot.com/2011/01/counterfeit-studio-calico-notions.html

Wednesday, January 5, 2011

It's HERE! Counterfeit Kit Challenge is up!

I am so excited! It has been a hectic month and a half and our vision is big, but Counterfeit Kit Challenge is up and running! The saying goes that Imitation is the sincerest form of flattery and we are planning on flattering some great kit clubs this year!

If you have never made a kit before, you are in for a treat! As a mom of 2 with limited time, I have found that creating kits for layouts, cards, mini albums and other projects is the most efficient way for me to get my mojo going. Sometimes I just make a basic kit and see what comes from it and other times I make a kit based on a theme of specific pictures/projects I want to get done. They are great to pull out at home when you have a few minutes and are wonderful if you are going to a crop and don't want to drag everything you own. Can I tell you the best part? Making up a kit from your own stash is a wonderful way to save money and use what you already own as well! Here are some samples of the kits that sparked the idea over the year ago.

Have I convinced you yet? LOL Every month, on the 5th, Meridy and I will post a kit from a monthly kit club that we love and want to "copy" with our own stash. Over the next few weeks, we will show you examples of our kits and give you links to ways for YOU to create some of the embellishments in the kit. The last two weeks we will offer challenges and a blog hop so that we can share our work and use our kits. All through the month you can check both the main blog and each of our blogs for inspiration and fun ideas! We have plans to post several times a week, so check back often!

Rush on over to http://counterfeitkitchallenge.blogspot.com/ to see the beautiful kit we will be re-creating this month! And if you decide you would rather just purchase that kit, we promise not to tell. :) Tomorrow Meridy will be showing you the kits WE created based on that inspiration and I will be posting on this blog how I plan to store my kits.

I hope you will play along, create alot and share with us on our blog! We will have a rockin' year together and get alot of beautiful creations made!

Tuesday, January 4, 2011

Christmas Break Blues

It is the last day of Christmas break and I am sad. I think I actually have more time to create when the kids are OUT of school. LOL Isabel is 1/2 day Kinder, so I feel like I am running back and forth to the school all day long (drop off Collin...go home....take Isabel a bit later...go home...pick both of them up...homework...snack...play...dinner...bed...whew!) or working at the school. We have not done a lot of "special" things (ie: going places), but it has been a very relaxing break.

Here is a layout I just finished about my daughters first day of Kinder. It looked a bit bare to me, so I went a bit button and bling crazy. LOL

The paper is from Cosmo Cricket's Girl Friday. I even decided to make an embellishement. Can you tell which one? LOL I loved the apple ribbon, but couldn't figure out what to do with it, so I looped it and attatched a brad I made with my I-top. Voila! Cute flower!
Stay on the lookout for the Counterfeit Challenge's first kit challange tomorrow! I can't wait!


Monday, January 3, 2011

One Little Word Layout

I was inspired by a new class on 2 Peas (http://www.twopeasinabucket.com/classes_and_events/classes/19-scrapbook-stamping-with-nichol-magouirk/) to do some stamping on my One Little Word Layout. I was so happy to be able to use this K&Co. paper. My pet peeve about this is that I couldn't find the Alpha stamps I wanted to use. They seem to have disappeared. Boo! Instead I created my own patterned paper with an alphabet stamp and cut out the title with my Cricut. It works. Still wish I could find that stamp, though!

Cardstock: Coredinations
Patterened Paper: K& Co. Amy Butler Lucky Flowers Pad
Stamps: Unity (phrase), unknown flower stamp, unknown date stamp
Other Supplies: I-Top