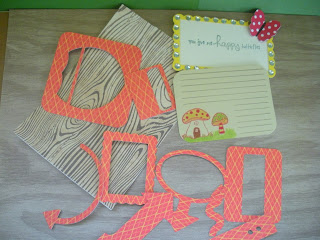
At first I was thrilled about the idea of all of these mini kits. Then the overwhelming feeling crept over me. It was sort of like being in a store and not knowing what to look at first.
Since I want this to be FUN for you and not overwhelming, I am going to walk you through my kit making process (remember....we only had 4 days to put ours together to show you!).
The key is to remember that you are making YOUR OWN kit. You may copy as much or as little as you like about Into the Woods. Don't feel like you have to copy every single thing from the kit. If you won't use it then skip it. I promise no one will tell.
Another important thing is to be as organized as you can. Have a plan of attack! My first step was to copy and past the list contents into a Word program to print out so I could have a paper list of each kit's supplies. Then I thought about whether I wanted to pull ALL of the papers for each kit first or just focus on one kit at a time and complete the kit before moving on. For me finishing each kit before moving on made more sense.
My paper:
Cardstock:
Green, Cream, Yellow, Tan, Dark Brown
Patterned Paper came from the following:
The Paper Studio, K&Company, The Green Stack, Sassafrass Bungle Jungle, Cosmo Cricket the Boyfriend Stack
Embellishments:
Sunrise Thickers: Lyrical Letters Cricut Cartridge
Chipboard Shapes: Random Chipboard Stars
Label Stickers: Labels/shapes from Going Places, Graphically Speaking and Preserves Cartridges
Woodgrain Fabrips: Woodgrain pattern printed on Sticky Back Canvas (4x6 piece)
Mini Alphabet: Sassafrass Large Graph Letters
Remember Buttons: Random from my stash
Vintage Bumble Bee Stamp: CTMY Bugs set
Veneer Journal Card: Made myself...check back tomorrow
Happy title: Made myself: Cricut Preserves Cartridge; Together We Bloom by Unity
Added: Tiny Type in Red
Aren't those orange shapes fun? I had a ball making them!
Okay, I HAD to add a bunch of woodsey stamps. I *cough* love owls, so I have alot of those stamps.
You can do this! Just take it one step at a time! You don't have to copy all of the kits like the three of use crazy ladies did. Just pick what you like! See you back here tomorrow for a pictorial of my mushroom notecard!
***More tutorials/pictures of how to make this kit on the Counterfeit Kit Challenge Blog!
Subscribe to:
Post Comments (Atom)


6 comments:
Bethany, we were meant to be together. I love owls as much as you do-it was like looking at my own owl stamp stash! I went with a butterfly theme for my kit-now I really wish I had gone with the woodland/owl theme! Maybe I will have to sneak in a couple. :) Your kit looks fabulous! I love the woodgrain fabric and the journaling card that you made. Can't wait to see your tutorial tomorrow!
Love your kit! I enjoyed reading about your process, you take a little different approach than I do. It's fun to see how other people think. Can't wait to see what you make with this.
Great kit. I love your orange shapes you made. I can't wait to see what you make.
TFS
Ang
Great tips! That's why I chose one of the add-on kits for my first attempt at Counterfeit Kits. Thanks for stopping by my blog and leaving a comment!
I do love those orange shapes I may need to play more with my cricut but I don't think my basket can hold one more embellishment
I never thought to print out the content list of the kit. I just stare at the photos and pull paper, then embellishment and finally alpha. In fact I think we both pick one of the same alphas for our kits. But I really like to look at the paper color and tone to match, not so much the same pattern.
Post a Comment